没有需求就没有任务,没有任务就不想看代码。但是对于分配了代码讲解任务的人来说,终于还是有不得不看代码的“任务”。
C或者Java等“严谨语言圈”对阅读源码有一种谜样的执着,仿佛大神都是从阅读源码一步一步修炼过来的。但是对于“不严谨”的JavaScript语言圈来说,却明显缺少这样的执着。究其原因,各端兼容占了60%的时间,然后滚滚而来的需求和层出不穷的轮子,让JS码农甚至无暇顾及代码的可读性;JS天生的“不确定性”,也让接触的人摸不着头脑,而JS的进步也并不靠本身的规范和增强,而是全靠工具库、轮子和社区贡献。所以读代码的时候,下一个轮子已经碾压过去了。
但是读代码就没有用了吗?至少看一下代码设计的新思路,这门语言的“奇巧淫技”般的写法,或者做一些“魔改”,都是大有好处的。
下面正文开始。
不管是官方例子或各种教程介绍里,对于初次使用React组件,应该都会有个类似下面的例子:
class Hello extends React.Component {
render() {
return
Hello {this.props.name}
;
}
}
ReactDOM.render(
,
document.getElementById('root')
);
上面代码使用了JSX语法,由JSX编写的代码是无法在浏览器中运行的,需要用Babel来将它编译成正常的JavaScript表达式。关于这部分如果有疑惑,可以参考 官方说明。
最终编译结果大概是这样:
最终编译结果大概是这样:
class Hello extends React.Component {
render() {
return React.createElement('div', null, `Hello ${this.props.name}`);
}
}
ReactDOM.render(
React.createElement(Hello, {name: 'World'}, null),
document.getElementById('root')
);
以调试方式查看代码
源代码是react-15-stable版本,这是一个比较老的版本,使用的是Stack引擎,新版本(react-16+)使用的是Fiber,但是整体结构已经比较完善。有时候,从比较初期的版本往后看,能对代码整体脉络和结构由更准确地把握。
代码查看,推荐使用调试工具。起初啥都没用,就直接挨个文件找function,然后对应几篇代码讲解文章,看的云里雾里。后来突然看到一篇文章以调试顺序讲解代码,打开WebStorm的调试,笑出了猪声。
WebStorm,配合chrome插件。这个组合可以很方便地在WebStorm里单步调试,比chrome自带的调试工具功能丰富,查看代码的运行情况也更方便。
关于如何使用WebStorm在chrome里调试JS,请看 这里。
调试目标文件,可以自己写个简单的例子,调用编译之后的
react.js和react-dom.js文件(位于build目录)。或者直接打开example目录,几个基础的例子就够用了。调用栈里用到的标签
– 函数调用
= 别名
– 函数调用
= 别名
初次简单渲染
这里叫初次简单渲染,是因为直接在根节点渲染只有一级的简单组件,只渲染一次,不包含状态更新和其他生命周期函数操作。
React.createElement( type, [props], [...children] )
=ReactElement.createElement( type, config, children )
-return ReactElement( type, key, ref, self, source, ReactCurrentOwner.current, props )
{
type: function(props, context, updater) {...} // reactClassComponent: {displayName:'Hello',...},
key: null,
ref: null,
props: {name: 'World'},
_owner: ReactCurrentOwner.current
}
整体流程

react-render-overall
下面所有函数所在文件均位于
react-dom/lib/从编译后的代码可以看出,
ReactDOM.render这个函数就是唯一入口了。ReactDOM.render
=ReactMount.render( nextElement, container, callback )
=return ReactMount._renderSubtreeIntoContainer(
null,
nextElement, // 上一步生成的ReactElement对象
container, // 'root'节点,HTML-Element
callback,
);
_renderSubtreeIntoContainer主要负责以下任务:1.包装
nextElement(仍然使用ReactElement.createElement){
type: TopLevelWrapper,
...
props: {
child: reactElement // 上一步生成的ReactElement对象
}
}
2.判断有无父级
ReactElement元素,这里从根节点创建的,所以没有(从react的dom树中取:ReactDOMComponentTree.getInstanceFromNode(rootEl))
prevComponent = getTopLevelWrapperInContainer(container);
如果有,需要更新父级元素。
3.判断是否有
react标记,且不包含非根的react元素,决定是否重用标记shouldReuseMarkupvar shouldReuseMarkup = containerHasReactMarkup && !prevComponent && !containerHasNonRootReactChild; // false
4.向虚拟DOM里渲染一个新的react根组件
return ReactMount._renderNewRootComponent(
nextWrappedElement, // TopLevelWrapper
container, // 'root'节点,HTML-Element
shouldReuseMarkup, // false
nextContext, // 空对象{}
)
-var componentInstance = instantiateReactComponent(nextElement, false); // *** 实例化React组件,此为实际被挂载的组件,nextElement为逐层传递的对象。
下面仅列出
batch调用栈,暂时忽略BatchingStrategy运行机制-ReactUpdates.batchedUpdates(
batchedMountComponentIntoNode, // 实际执行的函数
componentInstance, // ReactCompositeComponent
container,
shouldReuseMarkup,
context,
);
=BatchingStrategy.batchedUpdates(
batchedMountComponentIntoNode,
componentInstance, // ReactCompositeComponent
container,
shouldReuseMarkup,
context,
);
-batchedMountComponentIntoNode(
componentInstance, // ReactCompositeComponent
container,
shouldReuseMarkup,
context,
);
5.最终的渲染会在
transaction中执行(暂时忽略transaction的运行机制)-mountComponentIntoNode
=var markup=ReactReconciler.mountComponent( // Initializes the component, renders markup,
// and registers event listeners.
wrapperInstance, // componentInstance
transaction,
ReactDOMContainerInfo, // 节点容器信息,同名函数生成(ReactDOMContainerInfo.js),包含
// _topLevelWrapper, _idCount, _ownerDocument, _node, _tag, _namespaceURI
context,
...)
|=internalInstance.mountComponent // *** internalInstance即上一步的wrapperInstance,函数实现ReactCompositeComponent.mountComponent(ReactCompositeComponent.js):用于初始化组件,添加属性,渲染标签,注册事件监听,react生命周期函数也在这里执行。
|= *** ReactMount._mountImageIntoNode(
markup, // 上一步生成的markup
container, // 'root'节点
wrapperInstance, // componentInstance
shouldReuseMarkup,
transaction
)
用
document.createElement等函数,把markup插入页面。小记
1.步骤4中如何确定实例化的对象类型,比如Hello自定义标签,div等HTML标签,或者字符串?
instantiateReactComponent函数会根据type==TopLevelWrapper,确定instance的实例类型:instance = new ReactCompositeComponentWrapper(element); // 再包装nextWrappedElement
var ReactCompositeComponentWrapper = function (element) {
this.construct(element);
}
注意文件结尾
_assign(ReactCompositeComponentWrapper.prototype, ReactCompositeComponent, {
_instantiateReactComponent: instantiateReactComponent
});
所以
this.cunstruct使用的是ReactCompositeComponent的构建函数,即实例化了一个ReactCompositeComponent组件。而根据不同的
type类型,还会实例化为ReactDOMComponent(HTML标签)和ReactDOMTextComponent(文本节点)。
jsx-to-vdom
在React中,并没有名为“Virtual DOM”的文件或者类。而上面3中实例化的类型,差不多就是react中的虚拟DOM(Virtual DOM)了。因为这几个组件,包含了需要创建浏览器DOM需要的所有信息。
2.react节点包装过程
1)
ReactDOM.render时生成的原始组件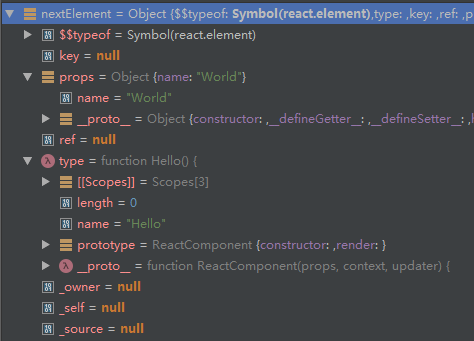
react-render1
2)
_renderSubtreeIntoContainer包装TopLevelWrapper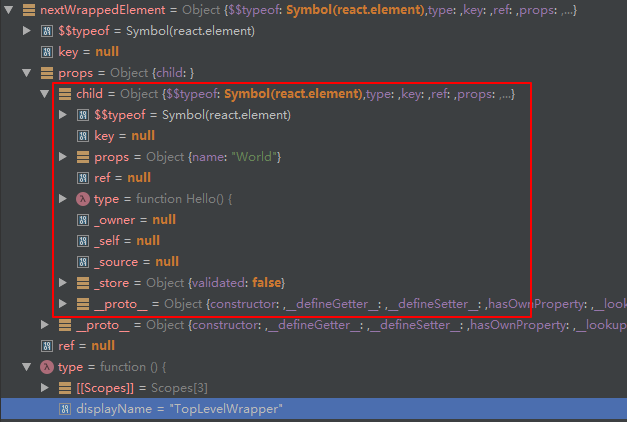
react-render2
3)
instantiateReactComponent时实例化组件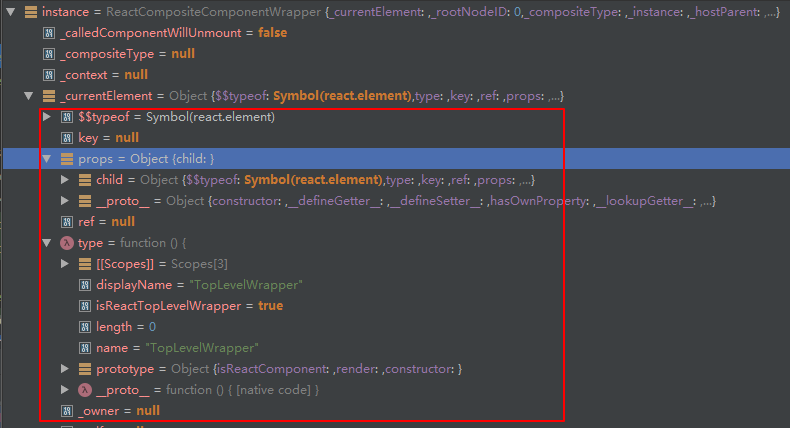
react-render3
步骤3执行了
ReactCompositeComponent的construct构建函数function construct(element) { // 添加和初始化各种变量,以后在mountComponent中赋值
...
this._currentElement = element; // _renderSubtreeIntoContainer包装过的wrappedElement
this._rootNodeID = 0;
...
this._mountOrder = 0;
...
// ComponentWillUnmount shall only be called once
this._calledComponentWillUnmount = false;
...
}
接下来…
ReactCompositeComponent.mountComponent,setState更新过程,batchedUpdates,Transaction参考网址: